Sunday, October 31, 2010

Simple Wallpaper

How To Make A Simple Wallpaper Using Several Tools:

First, open several pictures file which you want to use to make a wallpaper by clicking "File + Open"

After choosing the pictures, create a new page to make the wallpaper by clicking "File + New".


Then, press right click at The Lasso Tool which is below The Rectangular Marquee Tool to choose the Magnetic Lasso Tool.

After clicking The Magnetic Lasso Tool, press the mouse and drag along the selected pictures which you want to crop it until you managed to meet back the point where you begin. Then, it will form a shape.

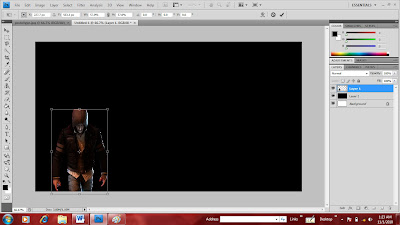
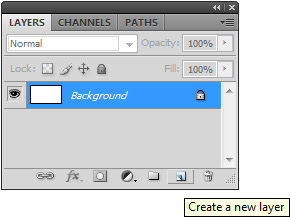
Click each of the pictures which you have cropped just now by using The Move Tool and drag it to the new page which you have created just now. Don't worry about the each of the picture layers. When you drag each of the picture to the new page, it will automatically will create a new layer. If the layer couldn't be created automatically, you can create manually by just clicking "Create a new layer".

Then, to resize the selected pictures which you want it to be smaller or bigger, press "Ctrl + T". Then, press "Shift" while enlarge the picture or smaller the picture using the mouse.

After finish resize a picture, press "Apply" so that the picture will be resize according to the size which you want it to be.

If you want to have another similar image of the cropped picture (duplicate an image), press right click at the picture layer you want to duplicate and select "Duplicate layer".

To create a background color, first press "Create a new layer". To color the background, you can choose either The Paint Bucket Tool or The Gradient Tool. If you want to play with the color tone, you can choose The Gradient Tool. To choose The Gradient Tool, press right click at The Paint Bucket Tool which is below The Eraser Tool and select The Gradient Tool. Then, click on a point and drag it to another point. Like me, i drag it to 45 degrees. Then, a black and white tone color (gradient) will be produce at the background because that is the default color. You can even change the tone color (gradient) into something else. You can even create your own combination of colors.

To edit the color tone (gradient), press The Gradient picker which is located below the "Edit".

To change the color, click the color stop. Then, you can select the color which you want.

If you want to add more colors, you can just click beside the color stop to add another color stop. After editing the colors which you want to have, press "OK".

This is one of the example of gradient color which I have edited for my background color.

Then, click on a point and drag it to another point.

After you have satisfied with your background color, you can save it. To save it, press "File + Save As".

Then, you can rename the file and locate at which place you want it to be place at. You can have any format you want for the wallpaper to be saved. If you want to edit the wallpaper next time, save the wallpaper as Photoshop (*.PSD;*.PDD) format. If you just want to have the wallpaper only, then you can save it as JPEG (*.JPG;*.JPEG;*.JPE). After completing it, press "Save".

This is my wallpaper which i have edited it and save it as JPEG. I rename the picture as Prototype Edited. This is my product of wallpaper.

Duplicate Layer & Gradient Tool

How To Duplicate A Layer & Use The Gradient Tool: 


You can continue the picture which you have resized just now. To duplicate a layer, you must right click the layer picture (Layer 1) and select "Duplicate layer".

After clicking the duplicate layer, you can rename it or just leave it.

After rename it, click the picture which u have cropped just now n drag it to where you want it to be placed.

After placing it in the right position, you can even resize the picture by clicking again "Ctrl + T". After resizing it, press "Apply".

You can even color the background by using another tool beside Paint Bucket Tool which is Gradient Tool. Gradient Tool is the tool where you can change the tone of the colors. Press right click on the Paint Bucket Tool and click on the Gradient Tool to use the Gradient Tool.

Then, click on a point and drag it to another point. Like me, I drag it to 45 degrees.

This is my product after using The Gradient Tool. This is the way of how to use The Gradient Tool to color the background layer.

Paint Bucket Tool & Resize Picture

How To Use The Paint Bucket Tool & Resize The Picture:


You can continue with the picture you have cropped just now. To create a background color, use the mouse and click on the "Create a new layer" icon.


To color the background layer, drag the mouse to the Gradient Tool which is below the Eraser Tool. Then, press right click and select the Paint Bucket Tool.


After clicking the paint Bucket Tool, click it on the background. It will turn out into black color because it is the default color. You can even choose different color by clicking on the color box icon which is below the Zoom Tool.


You might be wondering where is the picture which you have cropped just now. Don't worry. It never disappear. The cropped picture is and the back of the background layer. You must drag the picture to the front. The cropped picture must be on top of the background layer. To do so, you must click the layer background (Layer 2) which u created just now and drag in to the bottom of the layer picture (Layer 1). 


After dragging the layers, you can resize the cropped picture.

To resize the cropped picture, press "Ctrl + T". Then, press "Shift" and hold it while you were suing the mouse to resize the picture. The purpose of using "Shift" while resize the picture is so that the picture will not be different except the size (the picture will not be disturbed). This is the way of how to use the Paint Bucket Tool & resize the picture.

Magnetic Lasso Tool

How To Use The Magnetic Lasso Tool: 


First, drag the mouse and click "File" and "Open". Then, select a picture which you want to play with the magnetic lasso tool.


After selecting a picture, drag the mouse to the Lasso Tool which is below the Rectangular Marquee Tool. The, press right click and click the Magnetic Lasso Tool.


After selecting the Magnetic Lasso Tool, press the mouse and drag around the picture which you want to crop it until you managed to meet back the point where you begin. Then, it will form a shape.


Drag the mouse to "New" to create a new page.

Click the picture which you have cropped by using The Move Tool. Then, use the mouse and drag the picture to the new page which you have created just now.

When you drag the cropped picture to the new page, it will automatically create a new layer. This is the way of how to use the Magnetic Lasso Tool to crop a picture.

Layers

The Layers Palette: 

The layers palette lists all the layers in an image, starting with the topmost layer. Layers can be placed one on top of another and moved around by clicking one the layer name and dragging the mouse up or down.


Creating A New Layer: 


To create a new layer, you can simply click on the "Create a new layer" icon or else you can also add a new layer by going to the "Layer" menu located at the top of the screen and select New->Layer

Naming A Layer: 


You can also name your layer by double clicking on the name of the layer


Hiding A Layer: 


Just click the eye icon and the layer will be hidden