

Rename the file as "eWallpaper".

At the preset, change it to 'International Paper".

Change the size to "a4".

Then, change the height and width also. Use mm for the scale. The default will be 210 mm(width) and 297 (height). This is a portrait form. Reverse the scale to get the landscape form.

Change the resolution to 300 pixels. Make sure the color mode is RGB.

This is how the eWallpaper size look like.

Then, press "File" and "Open" to open the pictures which you want to have on the eWallpaper.

Do one by one by selecting one image.

This is the 1st image I choose to start edit my eWallpaper. I want to make tis picture as my background.

Click at the lock button in the background layer. Then, press OK. This is to ensure that we can remove and drag the whole picture to another place.

Then, click "The Move Tool" to drag the image to the eWallpaper file.

After dragging the image to the eWallpaper file, automatically a new layer will be form.

Press "Ctrl"+"T" to resize the image.

Before resizing it, press "Shift" while dragging resizing the image using mouse. This is to ensure that it doesn't break the pixels very much and the image.

Rename the layer as "Fireworks Background 1". It is important to rename your layer to ensure that what layer represent what content.

Then, open another file to start edit the eWallpaper.

After selecting an image, press right click at "The Lasso Tool" which is below "The Rectangular Marquee Tool" and choose "The Magnetic Lasso Tool".

Remember to use your mouse if you are using your laptop because any drawing or editing picture in computer must use the mouse. Make sure you use The Magnetic Lasso Tool properly. Make sure the selected image is being highlighted.

After the image is highlighted, drag the image to the eWallpaper file.

This is how the image will look like.

Rename the layer as "Indian Girl".

After that, open another image to be edited.

Again I use "The Magnetic Lasso Tool" to highlight the area which i want to drag like how I did to the Indian Girl image.

Then resize the image by pressing "Ctrl"+"T".

Make sure you press "Shift" while using your mouse to resize it.

Then, move the layer to down of the Indian Girl layer. This is to place the 2nd image at the back of the Indian Girl image.

Rename it as "Light".

Open the 3rd image.

This is my 3rd image.

Before highlighting the image, make sure you zoom it to get a clear view to highlight it by pressing "Ctrl" and "+".

Use "The Magnetic Lasso Tool" to highlight the image.

Drag the image to the eWallpaper file.

Rename the layer as "Malaysia Flag".

Drag the Malaysia Flag layer to the below of the Light layer.

Open the 4th image.

This time, i don't use The Magnetic Lasso Tool because the temple has many straight lines. It is difficult to highlight the straight line using The Magnetic Lasso Tool. So The best tool is by using "The Polygonal Lasso Tool" by pressing right click at The Lasso Tool and choose The Polygonal Lasso Tool.

Drag the image to the eWallpaper file.

Press "Ctrl"+"T" to resize the image. Again press "Shift" while resizing it.

Rename the layer as "Temple".

Move the Temple layer to the top of the Light layer.

Open the 5th image.

Use The Magnetic Tool to highlight it n drag it to the eWallpaper file.

Resize it by pressing "Ctrl"+"T" and press Shift while resizing it.

Rename the layer as "Lord Muruga".

Open the 6th image.

Use The Magnetic Lasso Tool to highlight it.

Drag the image to the eWallpaper file.

Press "Ctrl"+"T" to resize it. Don't forget about the "Shift" button.

Rename the layer as "Peacock".

I open the same image back which have the image of the light. I open it because I want to use the image background as my 2nd background.

This time I use The Polygonal Lasso Tool to highlight the background of the fireworks only.

Drag it to the eWallpaper file.

Resize the image as fit as the width of the image background.

Rename the file as "Fireworks Background 2".

Move the Fireworks Background 2 layer to the below of the Malaysia Flag layer.

After complete of arranging the layers, press "The Eraser Tool" which is below "The History Brush Tool" to erase the unwanted image.

After pressing it, select the image which u want to erase slightly to touch up. Remember that each time you edit a picture, make sure u select the layer which you want to edit or else you couldn't edit it, So, 1st select the Indian Girl layer n zoom the image by pressing "Ctrl" and "+". Then, remove the unwanted area like how I did and touch up the hair of the Indian Girl.

To remove the small area part of the image, change the master diameter of the brush. Select the smaller brush to erase the smaller image and vise versa for the bigger image.

1st

2nd
The 1st picture represent the original image and the 2nd image represent the image after i edit by erasing it using The Eraser Tool.

1st

2nd
Same goes to the Light image which I have erased slightly too.

1st

2nd
Beside using The Eraser Tool, you can use "The Magic Eraser Tool" by pressing right click at The Eraser Tool. This is to make use easier to erase a selected area. 1st picture shows the image of the flag. 2nd picture shows after the image was erase and edited by using The Magic Eraser Tool. The middle area between the flag and the post have gone.

Then, I use "The Clone Stamp Tool" which can be seen below "The Brush Tool".

1st

2nd

3rd
I use The Clone Stamp Tool to clone the wall balcony, the door of the temple and the background of the Fireworks Background 2.


Besides that, I open back the peacock image and I cloned the image of the grass and paste it at the area around the Lord Muruga, Peacock and the Temple. I make it look like a land.


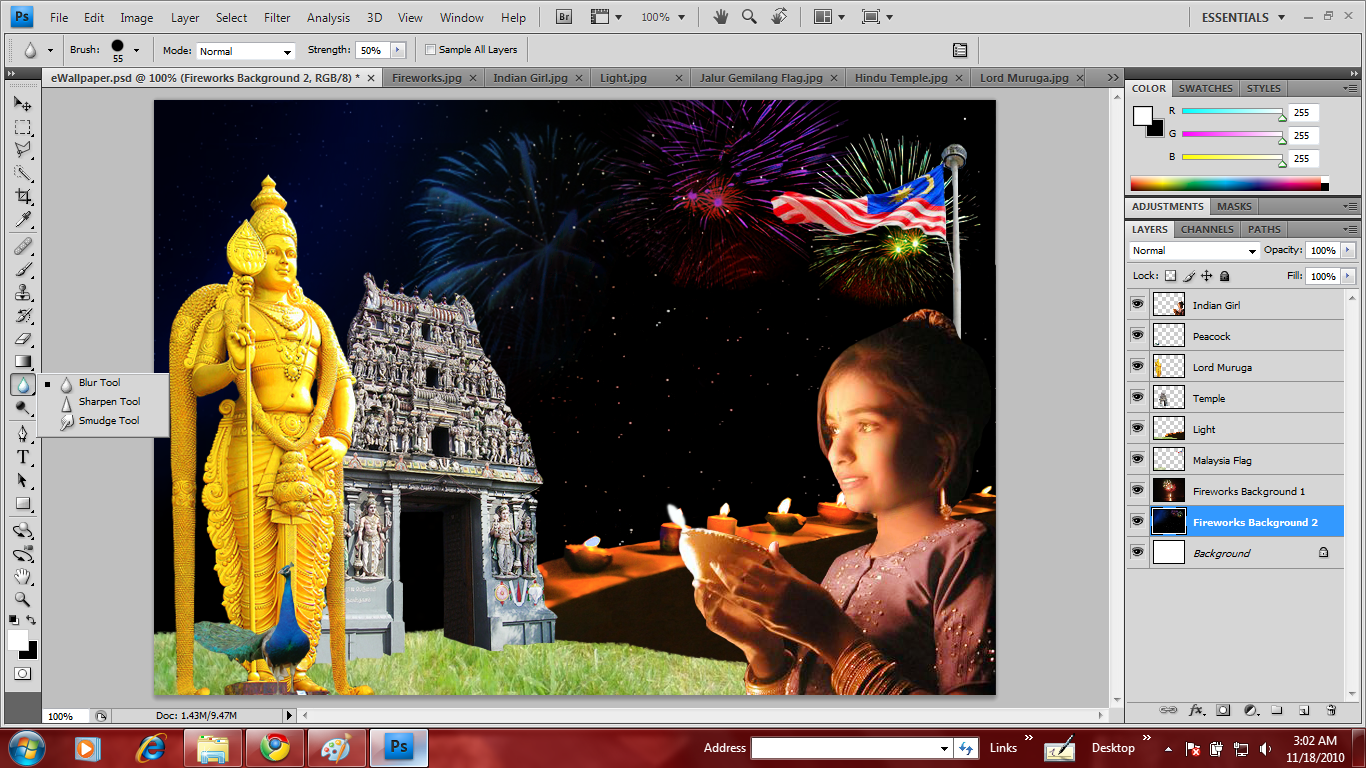
After that, I move the Fireworks Background 2 layer to the below of the Fireworks Background layer. Then I change it to soft light. The fireworks at the Fireworks Background appear. It combines with the Fireworks Background 2 to produce a main background. Then I choose "The Dodge Tool" which can be seen below "The Blur Tool".


Then, I change the range to "Highlight" and start to color it around the fireworks image to make the fireworks become brighter.

Then, press right click at The Dodge Tool and choose "The Spongy Tool" and color around the fireworks to make it become more clear n colorful.

Besides that, I use The Sponge Tool to make The Lord Muruga become brighter too. You can look the difference at The Lord Muruga. The picture shows us that top of The Lord Muruga is brighter and below is darker.


Then, I use The Dodge Tool again and change the Range to "Midtones" and color it at The Malaysia Flag and The Temple. You can view the differences between the two pictures.

Then, I press right click at The Dodge Tool and choose "The Burn Tool" to make the peacock look darker. I color around the peacock.


Then, use "The Healing Brush Tool" to heal and correct the surface of the skin of the Indian Girl's face. I select the area which I want by pressing "Alt" and click the mouse at the fair area and color it at the dark area of her skin to make her look more fair.

After that, I sue The Dodge Tool to make The Indian Girl dress look brighter as thought her dress have the reflection of the light. So, I color around her dress and her jewelleries too.
After then, I use "The Blur Tool" which can be seen below "The Gradient Tool" to blur the area behind the temple and the area of the blue fireworks.

Then, I choose The Fireworks Background Layer and press "Filter"+"Sharpen"+"More Sharpen" to sharpen the background.

Then, I press The Lord Muruga layer and press "Filter"+"Sharpen"+"Smart Sharpen" so that the Lord Muruga will look more realistic.

I even choose The Indian Girl layer and press "Filter"+"Sharpen"+:Sharpen" to sharpen her look.

After completing it, each of the layer I adjust the tone color by pressing "Image"+"Auto Tone".

Now, it is the time for The Topography. To create a text, you need to press "The Horizontal Type Tool" which can be seen below "The Pen Tool".

Then, I create a new layer for the text.

Rename the layer as "Deepavali Layer".

Type the text at the background. Type "Happy Deepavali".

Then, I changed the text font to Elfont(Block).
I even change it to sharp to make the font look sharper.

To change the color of the text, I press "Layer"+"Layer Style"+"Gradient Overlay".

1st

2nd
The 1st picture shows the gradient color. To change the gradient color to rainbow color or colorful, 1st we need to click to add stops. The 2nd picture shows how I arranged all the stops accordingly.

You can even click at the box to have some special effects on the text. I have choose several of them to have the special effects on my text.

Then, I move the Deepavali layer(Text) to the top of The Malaysia Flag layer. The size of my text is bigger now because I have changed my font size from 72 to 90.

Finally, I flatten all the layer to combine it into a layer. I did it by pressing "Layer"+"Flatten Image".

After flatten the layers, close all the images except the eWallpaper image.


After completing the eWallpaper, save it by clicking "File"+"Save As". Then, save as Photoshop (*.PSD;*.PDD) format and JPEG (*.JPG;*.JPEG;*.JPE) format.

This is the eWallpaper which I have done it using Adobe Photoshop CS4 and save it as JPEG format. The reason why I choose Deepavali Festival as my eWallpaper is that I also celebrate this festival because I am a Hindu. In Malaysia, this festival is celebrated by Indian together with Malays, Chinese and others. This festival is known as "Festival of Lights. That is the unique thing about this festival. During this festival, colorful decorations, lights n so on can be seen that makes the whole day become cheerful and the environment looks brighter. That is the specialty of this festival. That's why I choose Deepavali Festival as my eWallpaper.
I have tried to insert an audio which represent my eWallpaper but unfortunately, I couldn't able to insert an audio because I couldn't manage to do it in my blog. But, I will try my best to insert an audio to make the viewers view my eWallpaper peacefully.