Thursday, May 19, 2011
1 Malaysia Typography Project
I, Arvind Anandhan, 1102700421 as the group leader of Ore Malaysia have successfully done our kinetic typography project. We able to complete it just within a day with all our hard work and combination of all of group member power. Indraan Sathiamoorthy, 1102702199 is our animator of this project. He is the main person for this project Without him, we couldn't able to complete the project. Jaydevan Jayakumar, 1102700366, is the scriptwriter for this project. Vishnu Attiappan, 1102701726, is the creative head. Pravin Raj, 1101107703, is in charge for the music while myself is the director. We hope you guys will enjoy the video that we have created it which I have attached it.
Monday, May 2, 2011
My Animated Poster
This is my animated poster which was done by using Adobe Flash CS4. After completing it, i faced a lot of problems. I save my file is Adobe Flash format but then when I open it back, I tried couple of times but it still shows the word "CORRUPT". I managed to export my file and save it as swf format. That is the format that we should save in Adobe Flash. After saving it, I tried to open the video file but the sound and the video clip wasn't in the right time. The sound have skipped 2-3 second faster than the video clip. I tried to convert it into mpeg format but this time, the video doesn't have sound. So, I have decided to convert it into wmv format. That is my last option and finally I have made it. I able to produce my animated poster. The video that I have attached is about 1Malaysia Animated Poster. Enjoy..........
Tuesday, January 11, 2011
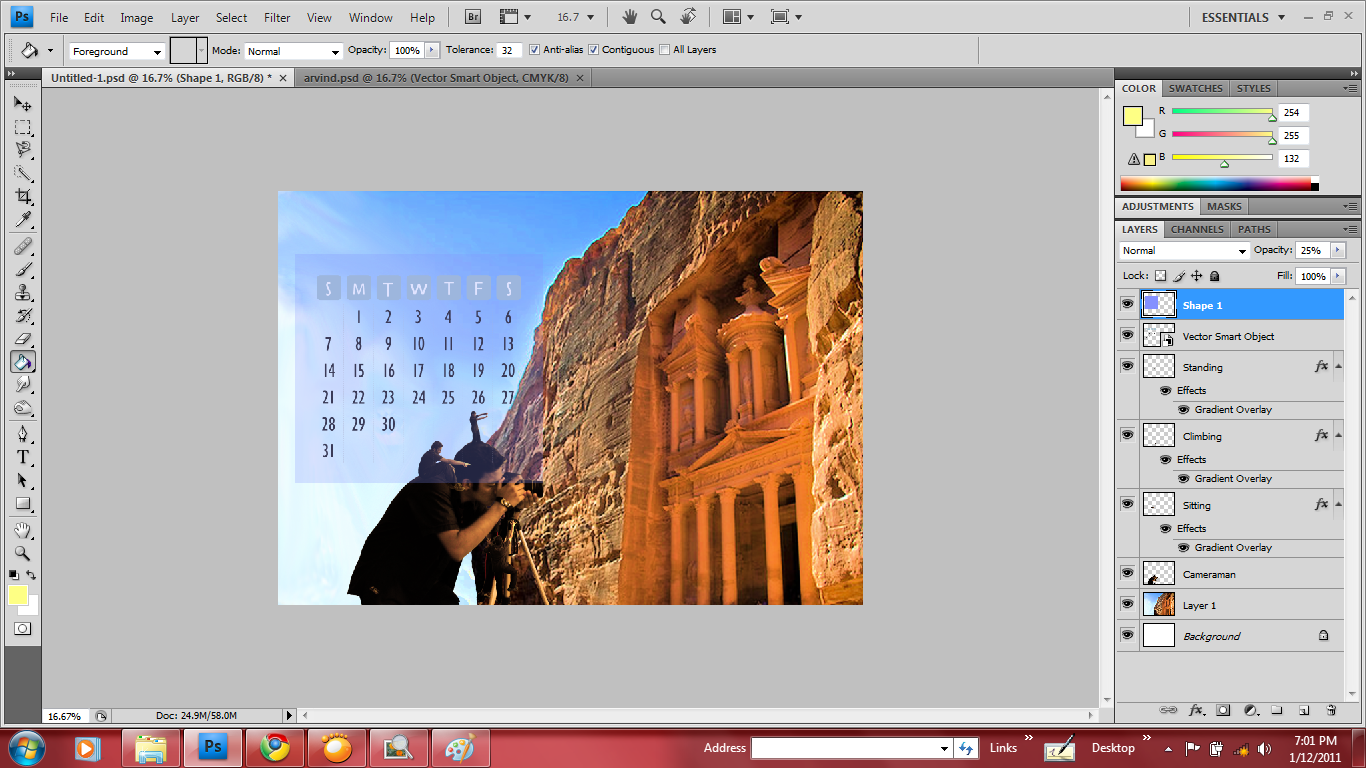
My Calendar
After the 1st assignment have completed we were given the next assignment. The second assignment was creating a calendar of 12 months by group work. Each of groups must have 6 members so that each members complete 2moths calendar. This ensure that all work is separated as equal. I am the group leader for Group 3 Computer Graphics and our group name is Kedai Gambar. Our theme for our calendar is Photo Manipulation with World Wonders. We have completed our calendar and each of us have to update it in our personal blog to show the ways of we did our calendar. So, I will show you my work of how I completed my 2 months calendar which were Month of November and December.
My November Month Calendar
 First, open press File + New to create a new page for me to do my calendar.
 Rename the paper but I never rename the paper because after edited it, I will create a new page which will be my real wallpaper. At that time, I will rename my paper but for safety, we should rename the paper. Then, change the preset to International Paper. Choose A4 size.
 To create a landscape size, reverse the size of width and height of the paper. Make sure the resolution is 300 pixels and the color mode is RGB with 8 bit.
 Press Open to open the image you want to put in your calendar. Select the picture you want.
 Make sure you use mouse when you do any editing images. Move your mouse pointer to Lasso Tool which is below The Rectangular Marquee Tool and press right click to choose Magnetic Lasso Tool.
 Magnetic Lasso Tool make use easily select the picture you want to crop. Move The Magnetic Lasso Tool around the picture you want to crop.
 After meeting the starting point where you started to use The Magnetic Lasso Tool, then, press Move Tool to move the highlighted area and drag it to the new page you created just now.
 To resize the cropped picture, press Ctrl + T. Then, don't just simply resize the picture or else it will be pixelated. To avoid of doing that, press Shift while you resize the picture to ensure the picture is not pixelated.
 To zoom the picture, press Ctrl +. Then, use The Magnetic Lasso Tool to crop the certain area which you couldn't crop just now.
 Then, press The Clone Stamp which is below The Brush Tool to clone the certain area like the surface of the tripod stand. To use the clone stamp, you must place your mouse pointer at the area you want to clone and press Alt with a click at the selected area. Then, touch up the tripod stand.
 I use The Eraser Tool which is below The History Brush Tool to erase the circle area at the tripod stand.

 Again I use the same technique to crop the image I did previously.
 I resize the picture and place it on the shoulder of the first image. Then, I double click the layer two to open the layer style. I tick the Gradient Overlay Box and double click it. Then, I change the blend mode to Overlay and then change the angle to show the angle of the light ray.
 I open again a new picture and follow the same technique to crop the picture.
 Besides that, don't forget to rename each of the layer.
 Again I crop a new picture.
 After placing it on the hair of the 1st image layer, I use the clone stamp to clone the hair and cover the shoe of that image so show that the shoe is covered with hair.
 Then, press Blur Tool which is below The Gradient Tool and press right click to choose The Smudge Tool to blur the clone hair to make it more realistic when the image is standing on the hair.
 To create a background image, press File + Open to select a picture for your calendar background.
 Press Image + Image Size to change the image size which should be equal to the calendar size. Make sure the resolution is 300 pixels.
 Click at the lock symbol at the layer to unlock the layer and the press OK.
 Drag the picture to the calendar and resize the picture by pressing Ctrl + T and make sure you press Shift while resizing the picture.
 Arrange the Background Layer (Layer 1) to the below of the Cameraman Layer. This is to ensure that the background picture moves towards back of all the picture layers.
 Click each layer while pressing Shift to select the certain layer to be resized. Then press Ctrl + T and resize it while pressing Shift too.
 Press Clone Stamp Tool to clone the sky by clicking the sky area while pressing Alt. The clone the sky around the rocks to make the rocks at the left side disappear.
 Press The Dodge Tool which is below The Blur Tool. Then press right click to choose The Burn Tool. Then, change the range to Shadow and color it on the hair to produce a darker hair image. You can also darken certain area which you want it to be darken like shirt, camera lens and so on.
 Then, press right click again at The Burn Tool to choose The Sponge Tool and color it on the skin to lighter the color skin.
 After lighten the skin, the select one of the layer and press Image + Adjustments + Photo Filter. Then, select the Warming Filter (85) so that the image will have the warm color reflection from the Petra background. Adjust the density according to your view and your choice based on the picture you edited it. After edited it, i do the same technique to the rest of the image layers.
 Then, I opened a file which contain the calendar box and numbers which I done it in Adobe Illustrator and exported it to PSD format.
 Drag the template of the calendar box to the calendar wallpaper. Then, press The Rectangular Tool which is below The Path Selection Tool and create a box shape to cover the template box calendar. To change the color of the box, change the foreground color and change the Opacity.
 Then, to create a text to represent the word "November" press The Horizontal Type Tool which is below The Pen Tool. Then, choose the Trajan Pro font for my November Text.
 Then, press ESSENTIAL which is on top of the panels at the right side and choose Typography. Change the color of the text and the font type to Faux Italic.
 After done it, double click at the November Text Layer and select Outer Glow Style. Double click again at the Outer Glow Style to change the color, spread and the size according to your style of choice and press OK.
 After completing it, press File + Save As and rename the file. Save it as Photoshop (*.PSD;*.PDD) format.
 After saving it in PSD format, don't forget to save it in JPEG (*.JPG;*.JPEG;*.JPE) format and make sure the image quality is at maximum.
 This is my final Month Of November Calendar.
My December Month Calendar
 First, open press File + New to create a new page for me to do my 2nd calendar. Rename the paper. Then, change the preset to International Paper. Choose A4 size.To create a landscape size, reverse the size of width and height of the paper. Make sure the resolution is 300 pixels and the color mode is RGB with 8 bit.


 To create a background image, press File + Open to select a picture for your calendar background. Press Image + Image Size to change the image size which should be equal to the calendar size. Make sure the resolution is 300 pixels. Click at the lock symbol at the layer to unlock the layer and the press OK. Drag the picture to the calendar and resize the picture by pressing Ctrl + T and make sure you press Shift while resizing the picture. Arrange the Background Layer (Layer 1). This is to ensure that the background picture moves towards back of all the picture layers. Arrange all the layers and place all the image according to your choices. Just make sure when resizing images, press Shift while resizing it.
 Then, press The Blur Tool to blur around the foot of the Christ The Redeemer's Foot.


My November Month Calendar


After erasing it, I open a new image to crop.


My December Month Calendar


Press Open to open the image you want to put in your calendar. Select the picture you want. Press The Magnetic Lasso Tool and move it around the picture you want to crop. After cropping it, drag all the pictures which have been cropped and move it to the calendar. Use The Eraser Tool to erase certain part of the images and you can use The Clone Stamp Tool to clone certain area of the images. Just follow the steps which is shown to do the 1st calendar just now.


Then, select one of the layer and press Image + Adjustments + Photo Filter. Then, select the Cooling Filter (80) so that the image will have the cool color reflection from the sky background.

Adjust the density according to your view and your choice based on the picture you edited it. After edited it, i do the same technique to the rest of the image layers. After that, I follow the same technique which I used to do my template box and month text for my 1st calendar and apply it to my 2nd calendar. The technique is the same. Is just that this time, the color of the box is different from the previous.

After completing it, press File + Save As and rename the file. Save it as Photoshop (*.PSD;*.PDD) format.

After saving it in PSD format, don't forget to save it in JPEG (*.JPG;*.JPEG;*.JPE) format and make sure the image quality is at maximum.
 This is my final Month Of December Calendar.
My Calendar References
My November Calendar References


My Calendar References
My November Calendar References


My December Calendar References


My Group Calendar

January

February

March

April

May

June

July

August

September

October

November

December
My Final Product Group Calendar

Main Cover

January

February

March

April

May

June

July

August

September

October

November

December
Subscribe to:
Posts (Atom)