Sunday, November 7, 2010

My Personal Photo Correction Exercise

After learning of how to do the basic photo correction, i was asked to correct my own personal picture. 

First, press "File" and "Open" to edit my personal picture.

Press The Crop Tool to select the certain area of the picture and then press right click and select crop.

Then, press The Clone Stamp Tool. I use this tool to clone my blue coat and highlight it at certain dark area so that the coat image will be neutralized.

Before cloning the blue coat, I zoom in by pressing "Ctrl" and "+" so that i can clone accurately. To clone it, I press "Alt" and press left click at the same time at the selected area.

After cloning the coat, i also clone the dark background and highlight it at the bright background because I want t have same background tone.

Then, i used The Magnetic Lasso Tool to highlight my collar shirt to change the color of my shirt.

After highlighting it, I Press "Image" + "Adjustments" + "Replace Color".

I use the Add to Sample at click it at the collar area which I have highlighted it by The Magnetic Lasso Tool. Then, I change the Hue and the Saturation. I change the red color collar into grey color. After I have satisfied with the color, I press OK.


Then, I use The Healing Brush Tool to fix my face skin. I make my skin become fair and smooth.

After fixing my face skin, I press The Sponge Tool. I want to make the picture become more brighter.

After choosing The Sponge Tool, I change the mode to saturate. Then, I highlight my face area by using The Sponge Tool.

After highlighting it, I press "Image" + "Auto Tone" to neutralize the tone color.

After completing it, I save it as Photoshop (*.PSD;*.PDD) if I want to edit it next time and I save it as JPEG (*.JPG;*.JPEG;*.JPE) as a wallpaper picture.


This is my personal picture which I have edited it and save it as JPEG. The 1st picture represents "Before Edited" and the 2nd picture represents picture "After Edited".

Basic Photo Correction Tutorial Which I have Learned In My Tutorial Class

There are many types of tools which I have used to correct the picture which I have selected to be corrected. I will show one by one of what tool I have used to correct the selected picture.

Crop Tool:
First, press "File" and "Open" to select a picture.

Then, press The Crop Tool which is below The Quick Selection Tool.

Click the mouse and hold it. Drag to the end of the picture.

Then, rotate the white background to the position of the picture.

After rotating it, make the white background as the same size of the picture.

Press right click and select crop.

The Rectangular Marquee Tool:
Zoom the picture to the area of the cap. To zoom in, press "Ctrl" and "+". After that, press The Rectangular Marquee Tool which is below The Move Tool.

Highlight the cap area by using The Rectangular Marquee Tool.

Press "Image" + "Adjustments" + "Replace Color".

Press "Add to Sample" which is beside The Eyedropper Tool. Then, click it at the cap.

Click at the Hue bar and drag it to choose the color which you want to apply to the cap. Then, press OK.

After that, press "Ctrl" and "-" to zoom out. Then, press at the box to remove the selection area of the cap.

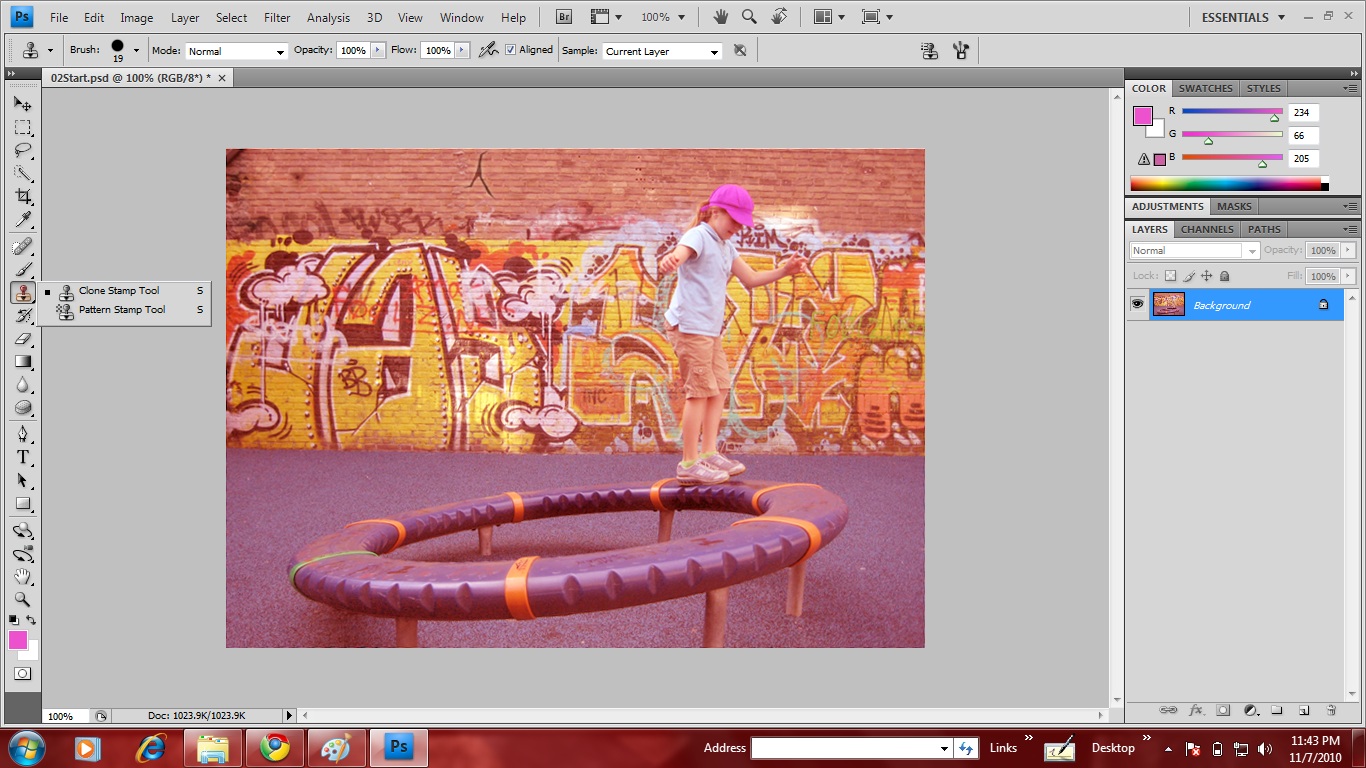
The Clone Stamp Tool:
Press The Clone Stamp Tool which is below The Brush Tool. 

Select the area which you want to clone. I want to remove the words which is above the Graffiti. It is annoying. So, I clone the wall by clicking "Alt" and left click at the same time at the selected area. Then, remove the words by clicking the mouse and move it around until the words is removed.

You can even change the size of The Clone Stamp Tool by changing the diameter of The Clone Stamp Tool. Small diameter can be used to clone the area which is small and hard to be clone.

The Sponge Tool:
Click The Sponge Tool which is below The Blur Tool. 

Change the mode to Saturated. Then, by using The Sponge Tool, click at the Graffiti and move it around. You will notice the changes of the color of Graffiti.

After playing around with The Sponge Tool, press "Image" and "Auto Color". This is to ensure the adjustment of the color changes that we made on the picture.

Then, press "Image" and "Auto Contrast" to adjust the contrast color.

After that, press "Image" and "Auto Tone" to adjust the tone color of the picture. You will be able to see the changes after pressing the Auto Color, Auto Contrast and Auto Tone.

The Healing Brush Tool:
Press The Spot Healing Brush Tool which is below The Eyedropper Tool. Then, press right click and select The Healing Brush Tool. After that, click it at the top left of the picture and move it around. It is like highlighting and coloring the whole picture. This Healing Brush Tool is used to fix a picture.


After completing it, press "File" and "Save As" to save the edited picture. You can save it as Photoshop (*.PSD;*.PDD) format if you want to edit the picture next time or save it as JPEG (*.JPG;*.JPEG;*.JPE) format if you want to have the picture to be as a wallpaper.


This is the picture which I have edited it and save it as JPEG format. The 1st picture shows the picture which is before being edited and the 2nd picture shows which is after being edited.

Sunday, October 31, 2010

Simple Wallpaper

How To Make A Simple Wallpaper Using Several Tools:

First, open several pictures file which you want to use to make a wallpaper by clicking "File + Open"

After choosing the pictures, create a new page to make the wallpaper by clicking "File + New".


Then, press right click at The Lasso Tool which is below The Rectangular Marquee Tool to choose the Magnetic Lasso Tool.

After clicking The Magnetic Lasso Tool, press the mouse and drag along the selected pictures which you want to crop it until you managed to meet back the point where you begin. Then, it will form a shape.

Click each of the pictures which you have cropped just now by using The Move Tool and drag it to the new page which you have created just now. Don't worry about the each of the picture layers. When you drag each of the picture to the new page, it will automatically will create a new layer. If the layer couldn't be created automatically, you can create manually by just clicking "Create a new layer".

Then, to resize the selected pictures which you want it to be smaller or bigger, press "Ctrl + T". Then, press "Shift" while enlarge the picture or smaller the picture using the mouse.

After finish resize a picture, press "Apply" so that the picture will be resize according to the size which you want it to be.

If you want to have another similar image of the cropped picture (duplicate an image), press right click at the picture layer you want to duplicate and select "Duplicate layer".

To create a background color, first press "Create a new layer". To color the background, you can choose either The Paint Bucket Tool or The Gradient Tool. If you want to play with the color tone, you can choose The Gradient Tool. To choose The Gradient Tool, press right click at The Paint Bucket Tool which is below The Eraser Tool and select The Gradient Tool. Then, click on a point and drag it to another point. Like me, i drag it to 45 degrees. Then, a black and white tone color (gradient) will be produce at the background because that is the default color. You can even change the tone color (gradient) into something else. You can even create your own combination of colors.

To edit the color tone (gradient), press The Gradient picker which is located below the "Edit".

To change the color, click the color stop. Then, you can select the color which you want.

If you want to add more colors, you can just click beside the color stop to add another color stop. After editing the colors which you want to have, press "OK".

This is one of the example of gradient color which I have edited for my background color.

Then, click on a point and drag it to another point.

After you have satisfied with your background color, you can save it. To save it, press "File + Save As".

Then, you can rename the file and locate at which place you want it to be place at. You can have any format you want for the wallpaper to be saved. If you want to edit the wallpaper next time, save the wallpaper as Photoshop (*.PSD;*.PDD) format. If you just want to have the wallpaper only, then you can save it as JPEG (*.JPG;*.JPEG;*.JPE). After completing it, press "Save".

This is my wallpaper which i have edited it and save it as JPEG. I rename the picture as Prototype Edited. This is my product of wallpaper.